Branding Settings
Introduction
The Branding Settings in Blinksale allow you to create a consistent, professional look for all your client communications. By customizing colors, fonts, and adding your company logo, you ensure that your invoices, estimates, and emails represent your brand identity effectively.Accessing Branding Settings
To access your branding settings:- Click on the Settings icon in the main sidebar
- Select Branding from the settings menu
- You’ll be taken to the branding settings page where you can customize your documents and emails
Branding Overview
The branding settings page is divided into two main sections:- Settings Panel: Where you can modify colors, typography, and logo
- Preview Panel: Shows you a real-time preview of how your changes will look
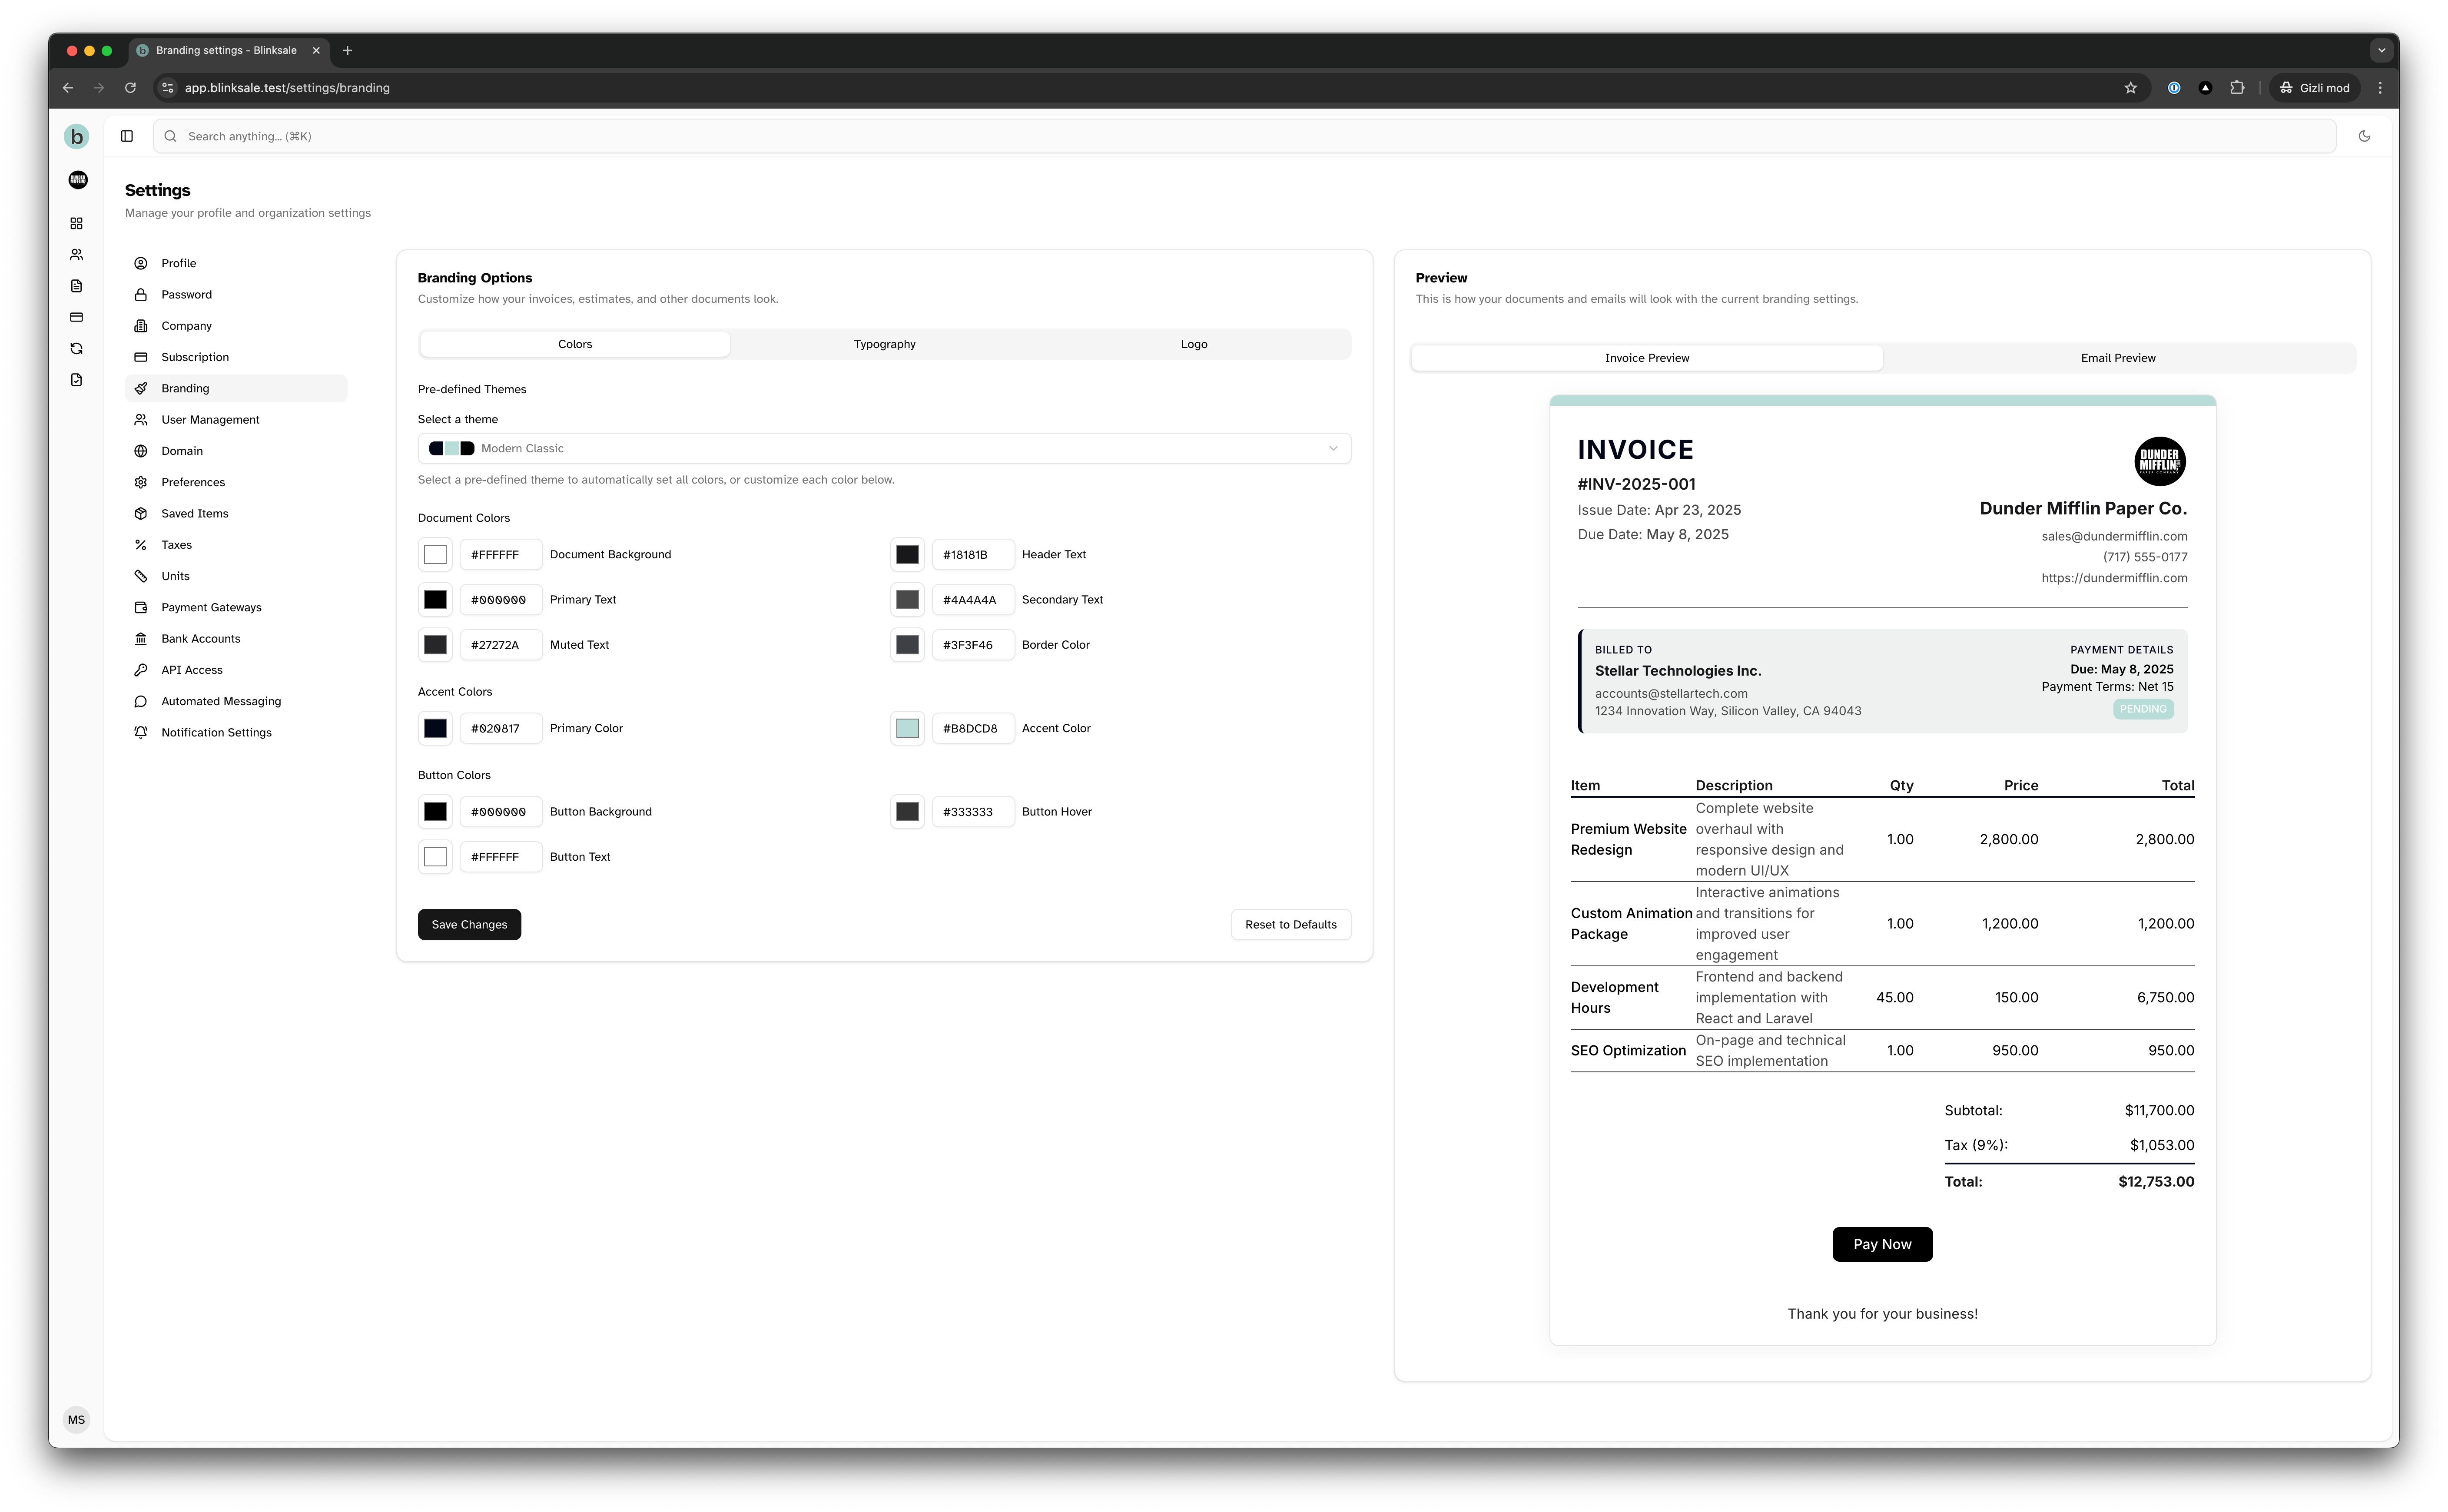
Color Settings
The Colors tab offers extensive customization options for the visual appearance of your documents.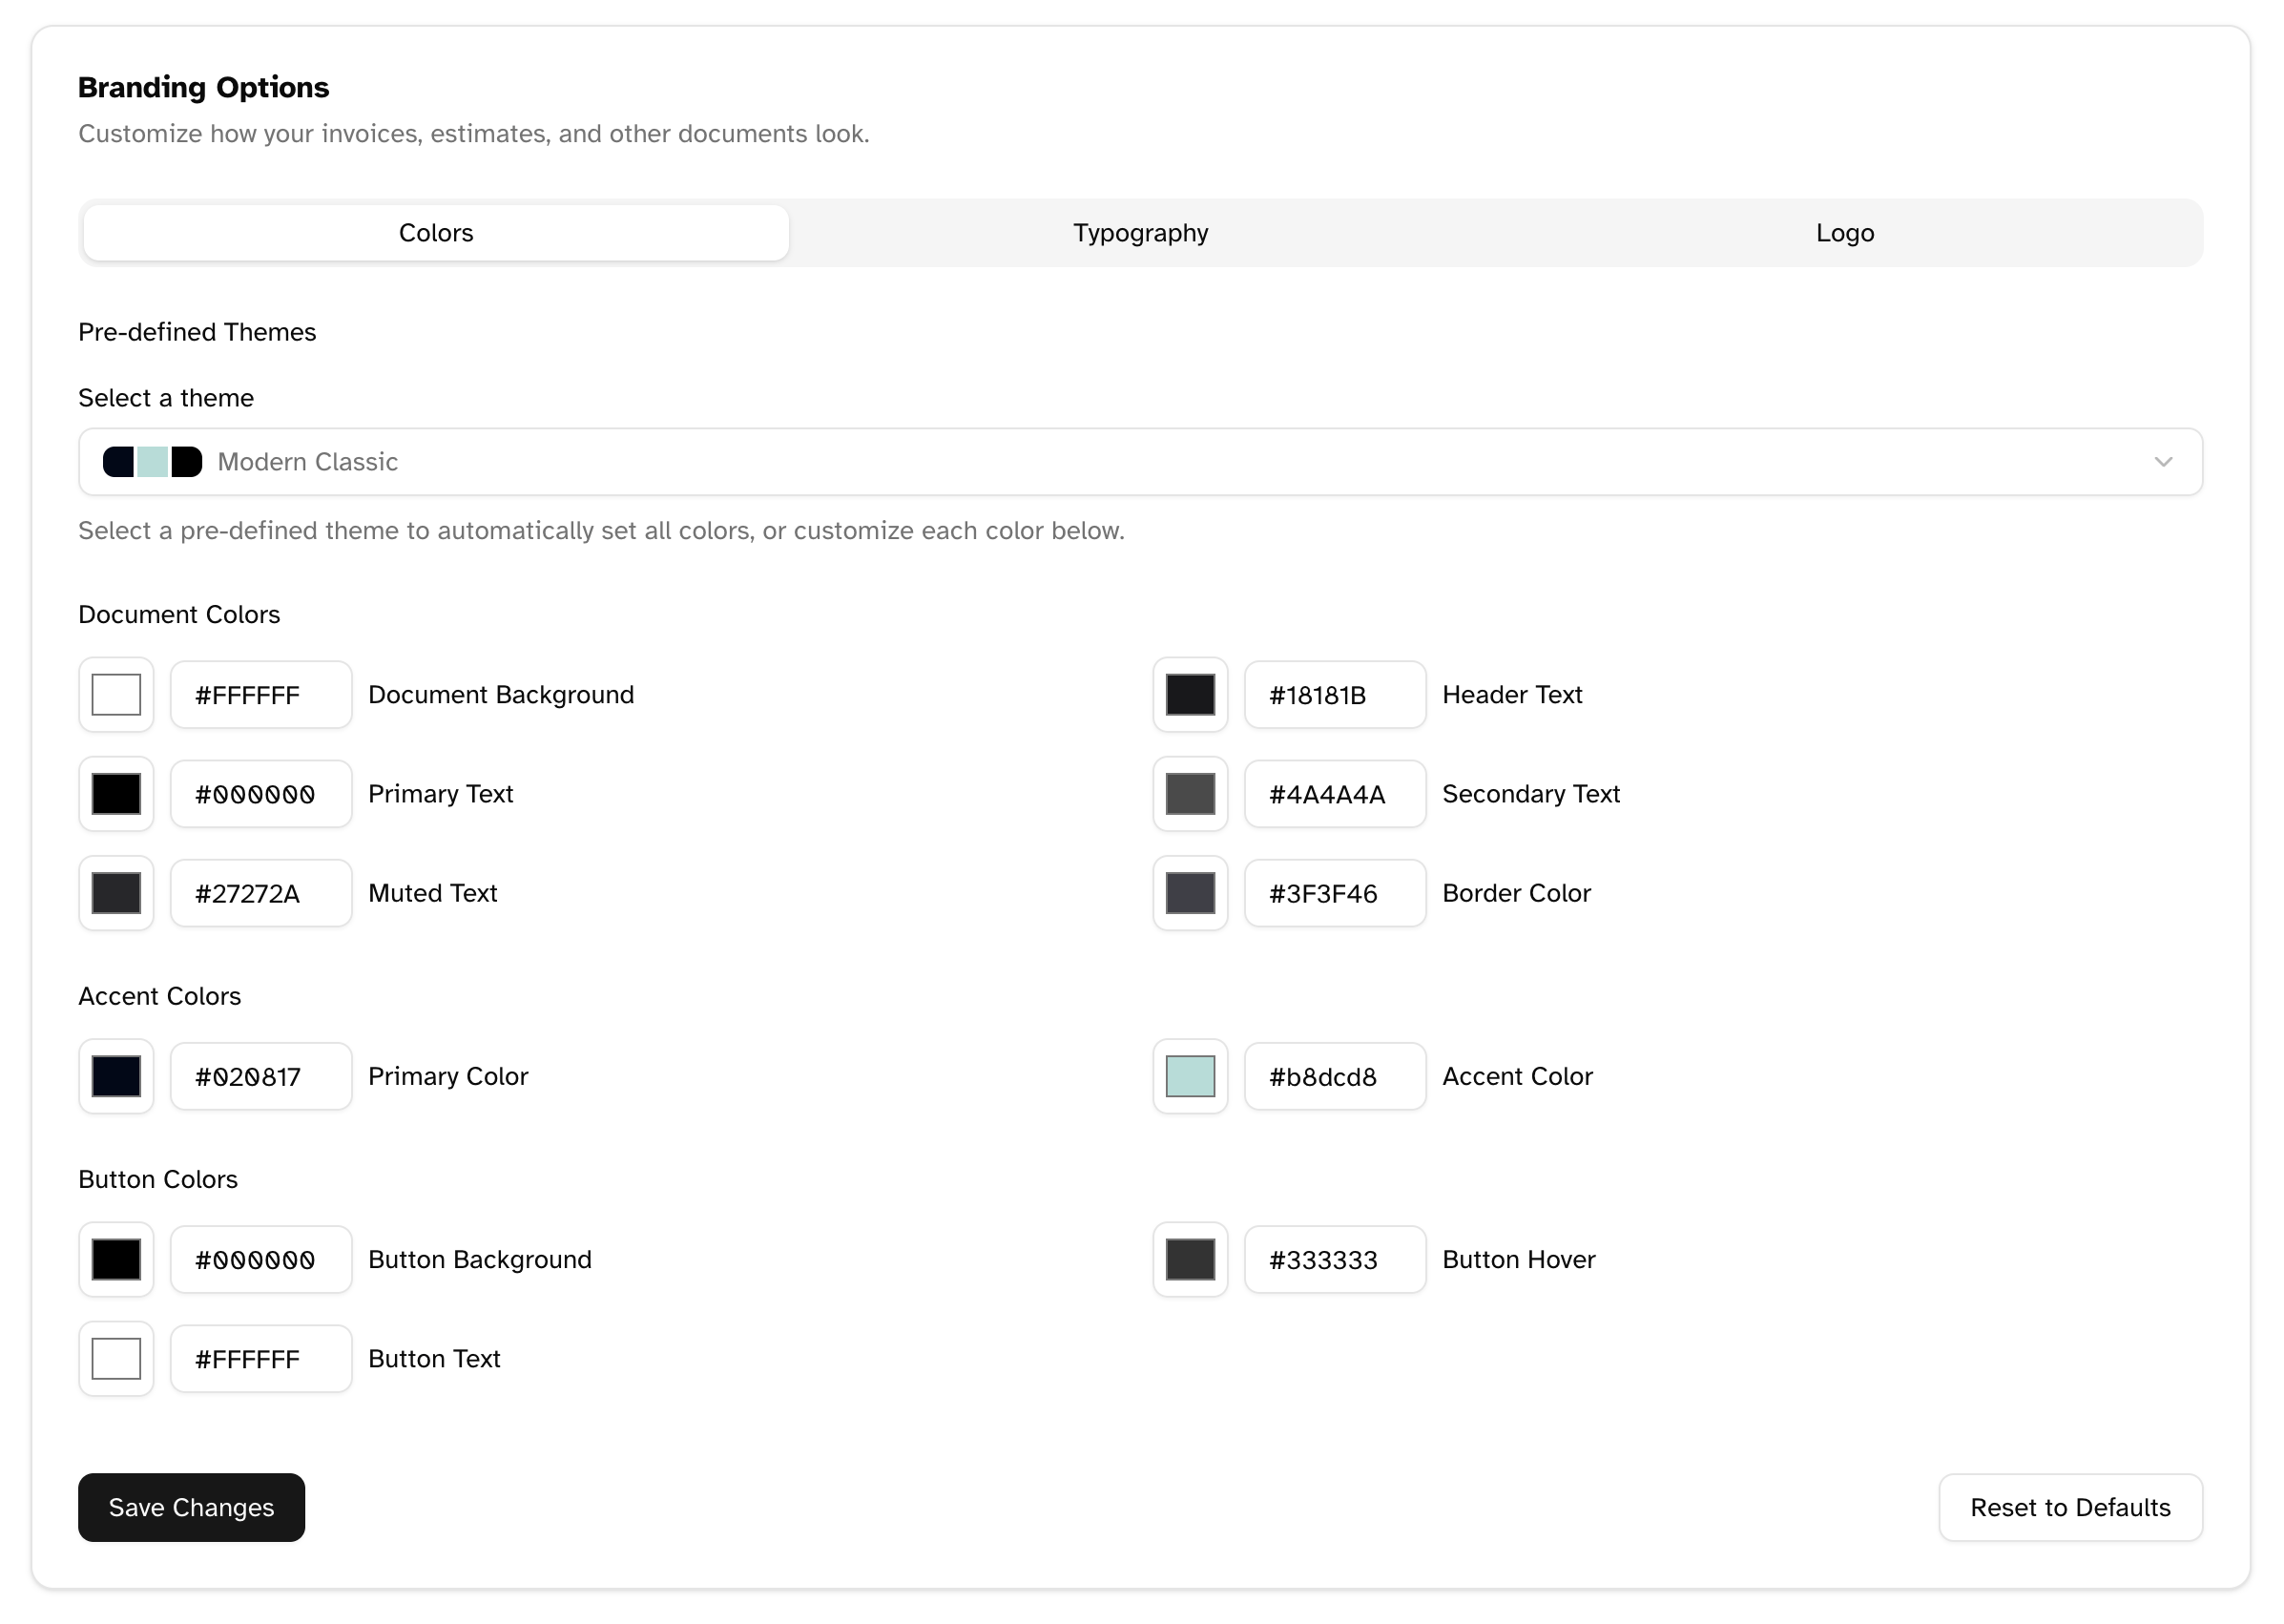
Pre-defined Themes
For quick styling, Blinksale offers several pre-defined color themes:- Modern Classic (Default): A professional, clean look with simple black and white
- Ocean Blue: A professional theme with blue accents
- Forest Green: A calming green-based color scheme
- Royal Purple: An elegant purple theme for a luxury feel
- Coral Sunset: A warm, energetic theme with coral accents
- Night Mode: A dark theme with light text for a modern look
- Minimalist: A clean, simple design with minimal color
- Navigate to the Colors tab
- Open the theme dropdown menu
- Select your preferred theme
- The preview will update instantly
Selecting a theme will update all color settings at once. Any manual color changes you’ve made will be overwritten.
Custom Colors
You can customize individual colors for complete control over your branding:Document Colors
- Document Background: The main background color for invoices and estimates
- Header Text: Color for titles and headings
- Primary Text: Main text color for most content
- Secondary Text: Color for less prominent text
- Muted Text: Color for footer text and other minor elements
- Border Color: Color for dividers and table borders
Accent Colors
- Primary Color: Your main brand color, used for accents and highlights
- Accent Color: Secondary accent color for visual contrast
Button Colors
- Button Background: Color for action buttons on documents
- Button Hover: Color when hovering over buttons
- Button Text: Text color for buttons
Typography Settings
The Typography tab allows you to select the font used across all your documents and emails.
Font Selection
Blinksale offers a variety of professional fonts to choose from:- Sans-serif fonts like Inter, Open Sans, and Atkinson Hyperlegible for a modern look
- Serif fonts like Merriweather and Georgia for a more traditional appearance
- Fixed-width fonts for a technical feel
- Navigate to the Typography tab
- Select a font from the dropdown menu
- The preview section will show how your selected font looks with different text styles
Choose a font that aligns with your brand identity and is easy to read, especially at smaller sizes used for terms and details.
Font Preview
The font preview section shows how your selected font will appear in different contexts:- Header text (used for document titles)
- Main text (used for most content)
- Secondary text (used for labels and details)
- Muted text (used for footer information)
Logo Settings
The Logo tab allows you to add your company logo to invoices, estimates, and emails.Adding a Logo
To add your company logo:- Navigate to the Logo tab
- Click the “Choose File” button
- Select your logo file (supported formats: JPG, PNG, SVG)
- The logo will appear in the preview section
- Click “Save Changes” to apply
For best results, use a PNG or SVG file with a transparent background. The recommended size is around 200-300px wide for optimal display across all document types.
Logo Guidelines
- File formats: PNG, JPG, or SVG (SVG recommended for best scaling)
- Maximum file size: 2MB
- Background: Transparent background works best
- Dimensions: Logos are automatically resized, but starting with a high-quality image ensures the best results
Removing a Logo
If you’ve previously uploaded a logo and want to remove it:- Navigate to the Logo tab
- Check the “Remove current logo” box
- Click “Save Changes”
Document Preview
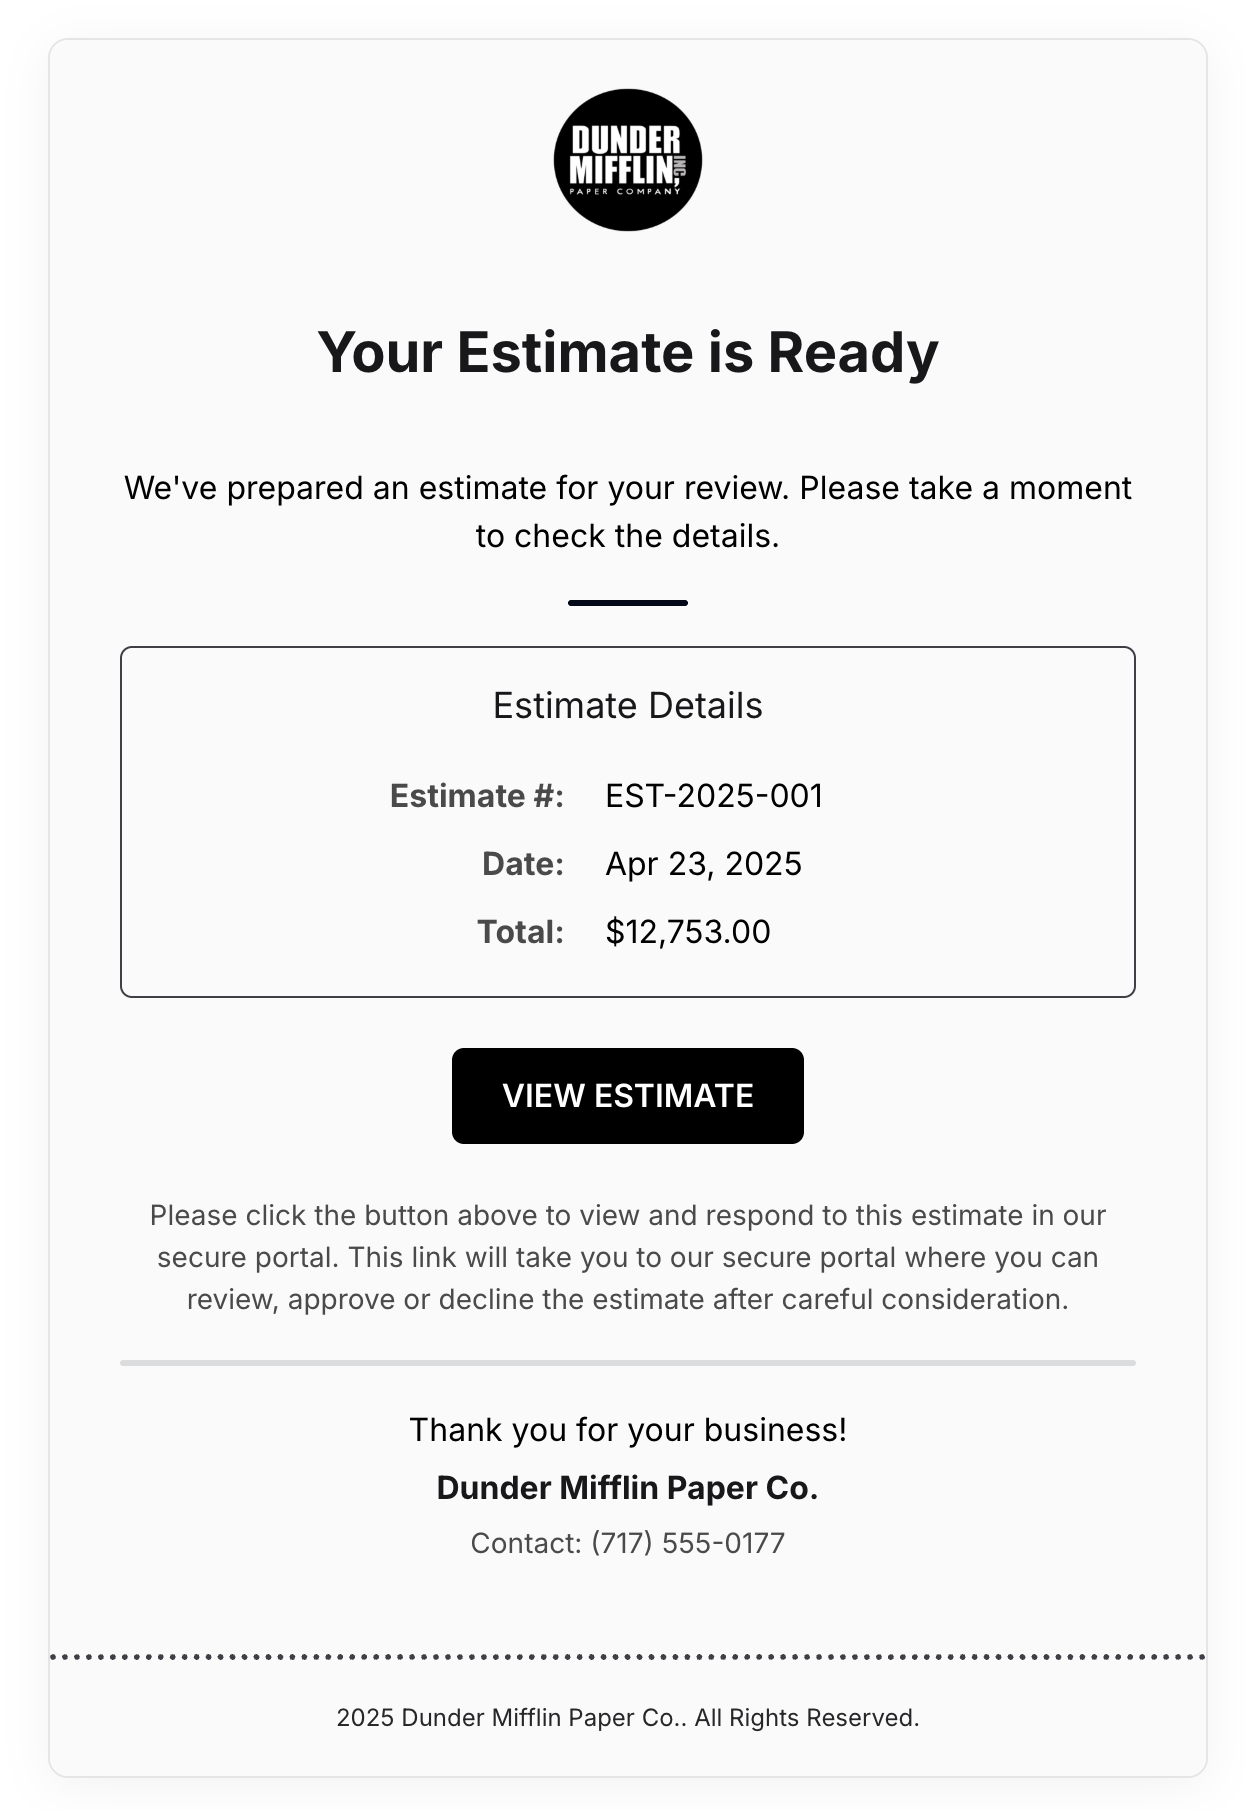
The preview panel on the right side of the screen shows how your branding choices will affect your documents. There are two preview tabs:Invoice Preview
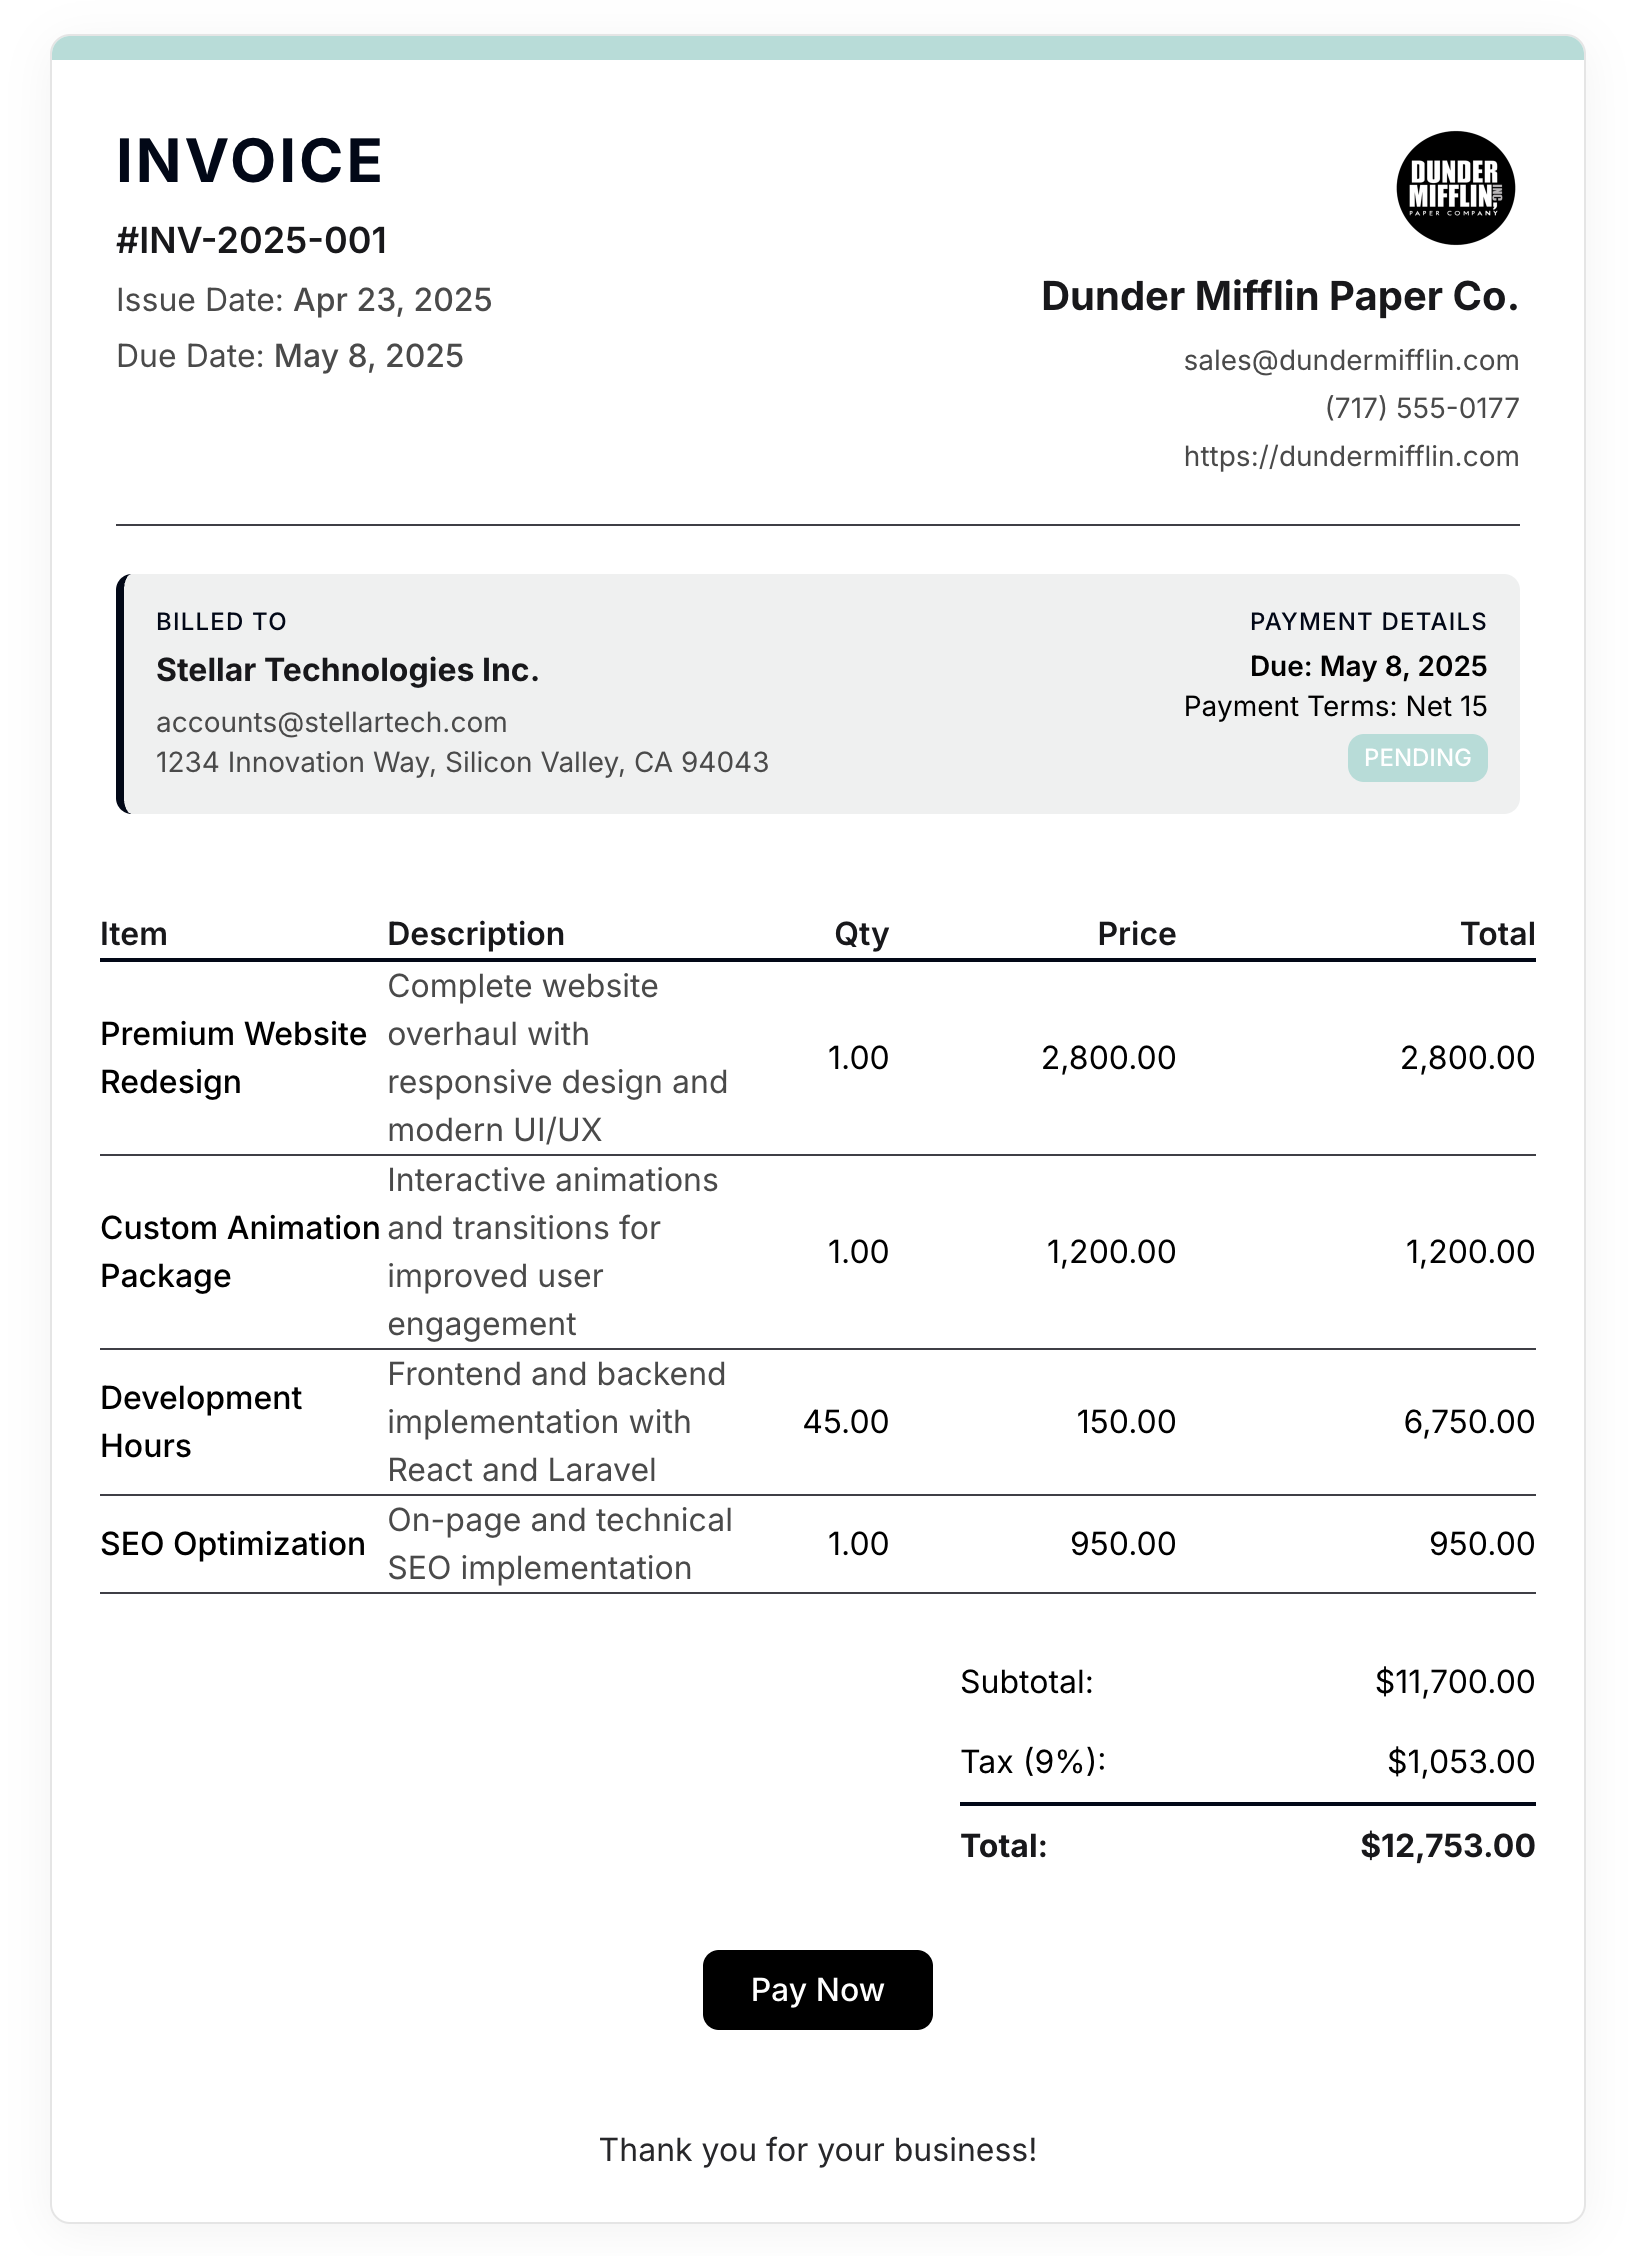
- Your logo (if uploaded)
- All color settings
- Selected font
- Overall layout with your branding colors
Email Preview
- Your logo in the email header
- Email layout with your branding colors
- Call-to-action buttons with your button colors
- Footer information with your company details
Saving Your Changes
After making your branding adjustments:- Review the preview to ensure everything looks as expected
- Click the “Save Changes” button at the bottom of the settings panel
- You’ll see a confirmation message when your changes are successfully saved
All changes apply immediately to new documents and emails. Previously created documents will not be affected by your branding changes.
Resetting to Defaults
If you want to revert all branding settings to their default values:- Click the “Reset to Defaults” button at the bottom of the settings panel
- Confirm the action in the dialog that appears
- All colors, typography, and logo settings will be reset to Blinksale defaults
Best Practices for Effective Branding
Color Selection
- Consistency: Choose colors that match your existing brand identity
- Contrast: Ensure sufficient contrast between text and background colors for readability
- Simplicity: Limit your color palette to 2-3 main colors for a professional look
- Accessibility: Consider color-blind users when selecting color combinations
Typography
- Readability: Choose fonts that are easy to read, especially at smaller sizes
- Consistency: Use the same font for all your business communications
- Professionalism: Select fonts appropriate for financial documents
Logo Placement
- Size: Ensure your logo is appropriately sized and not overwhelming the document
- Quality: Use high-resolution images that remain crisp on different devices
- Alignment: Consider how your logo appears next to your company name and details
Troubleshooting
Common Issues
Logo appears pixelated or blurry:- Use a higher resolution image file
- Consider using an SVG format for perfect scaling
- Keep the original aspect ratio of your logo
- Use the hex code input to enter specific brand colors
- Adjust individual colors rather than using pre-defined themes
- Check the preview on different screens, as colors can display differently
- Email clients may render some styles differently
- Focus on core branding elements like colors and logo
- Test emails to different email providers if needed