> ## Documentation Index
> Fetch the complete documentation index at: https://docs.blinksale.com/llms.txt
> Use this file to discover all available pages before exploring further.
# Users
> Learn how to invite, manage, and organize your team members in Blinksale
## Introduction
User Management in Blinksale allows you to invite team members to your organization, assign them appropriate roles, and manage their access. This feature is particularly useful for businesses with multiple team members who need access to invoicing, client management, and other features within Blinksale.
## Understanding User Roles
Blinksale offers two distinct user roles, each with different levels of permissions:
### Owner
* Complete administrative access to all organization settings
* Can invite and remove users
* Can change user roles
* Has full access to all financial information
* Can manage subscription and billing
* Can configure organization-wide settings
### Member
* Can create and manage invoices and estimates
* Can view and manage clients and contacts
* Can record payments
* Has limited access to organization settings
* Cannot invite or manage other users
* Cannot modify subscription or payment settings
## Accessing User Management
To access the User Management settings:
1. Click on the **Settings** icon in the main sidebar
2. Select **Users** from the settings menu
3. You'll be taken to the user management page where you can see current team members and pending invitations
 ## User Management Overview
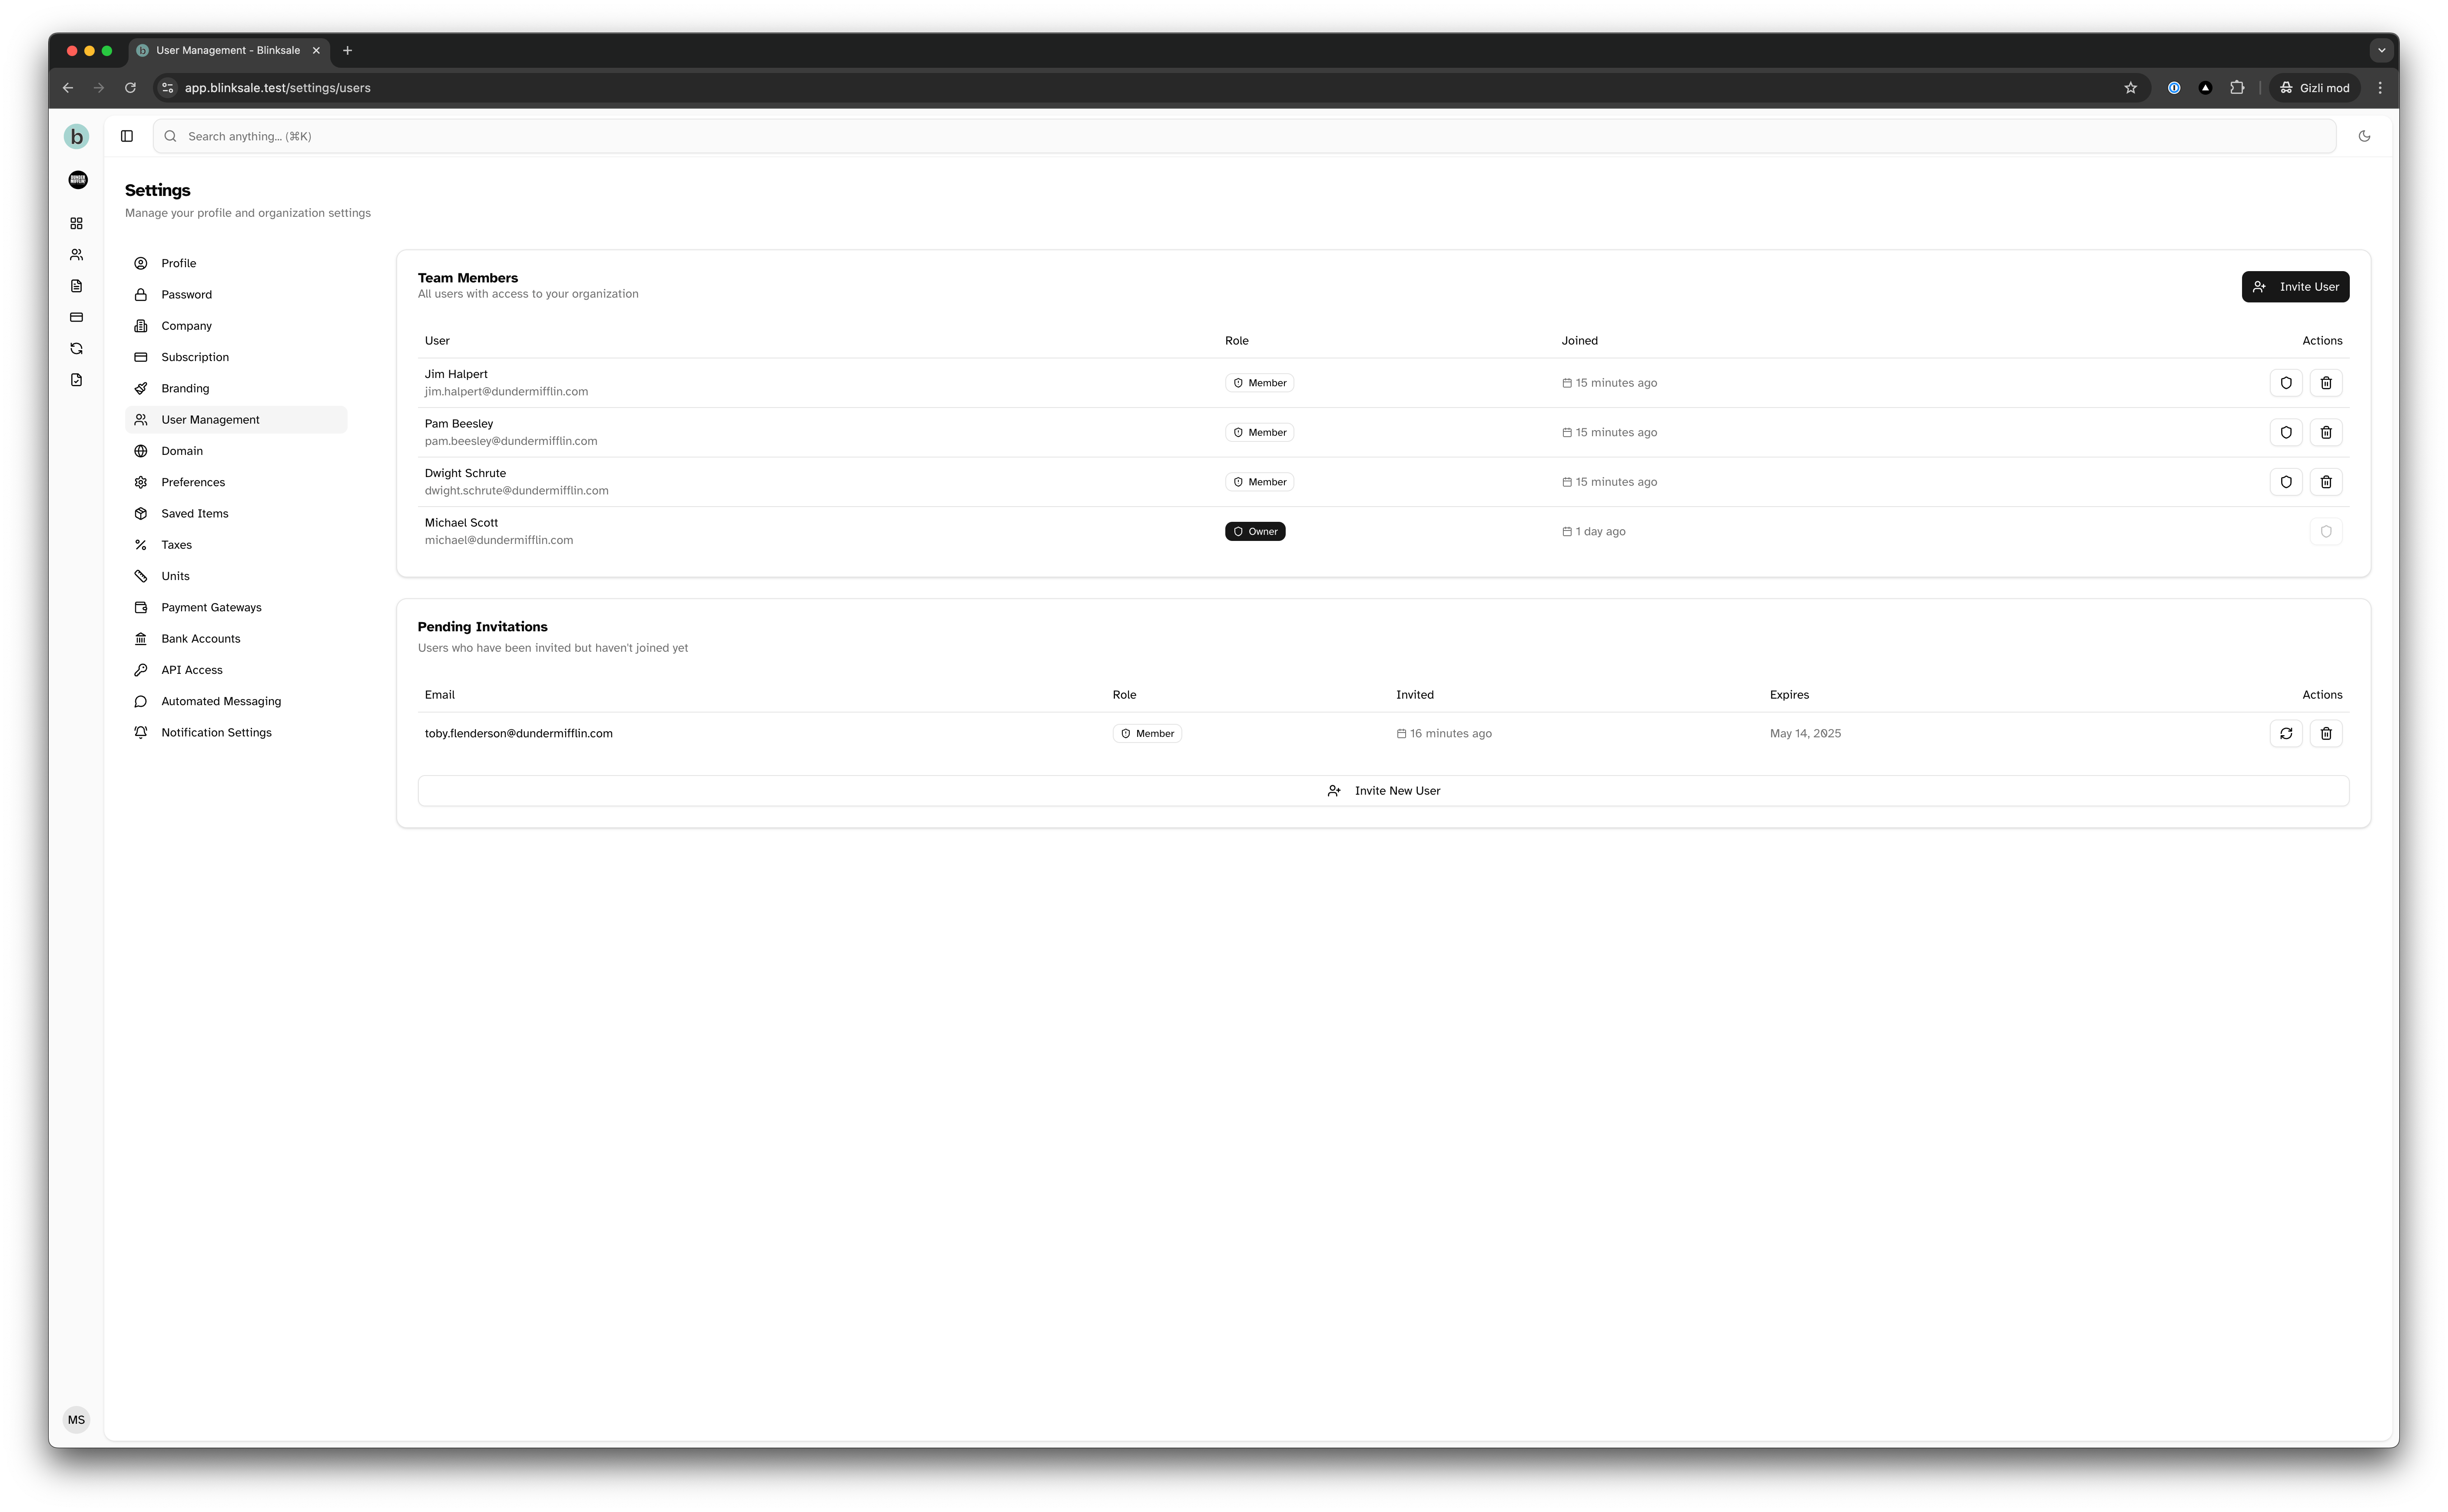
The User Management page is divided into two main sections:
### Team Members
This section displays all active users in your organization, showing:
* User name and email
* Assigned role (Owner or Member)
* When they joined the organization
* Actions you can take for each user (if you have owner permissions)
## User Management Overview
The User Management page is divided into two main sections:
### Team Members
This section displays all active users in your organization, showing:
* User name and email
* Assigned role (Owner or Member)
* When they joined the organization
* Actions you can take for each user (if you have owner permissions)
 ### Pending Invitations
This section shows invitations that have been sent but not yet accepted, including:
* Invitee's email address
* Assigned role
* When the invitation was sent
* When the invitation expires
* Actions you can take for each invitation (resend or cancel)
### Pending Invitations
This section shows invitations that have been sent but not yet accepted, including:
* Invitee's email address
* Assigned role
* When the invitation was sent
* When the invitation expires
* Actions you can take for each invitation (resend or cancel)
 ## Inviting Team Members
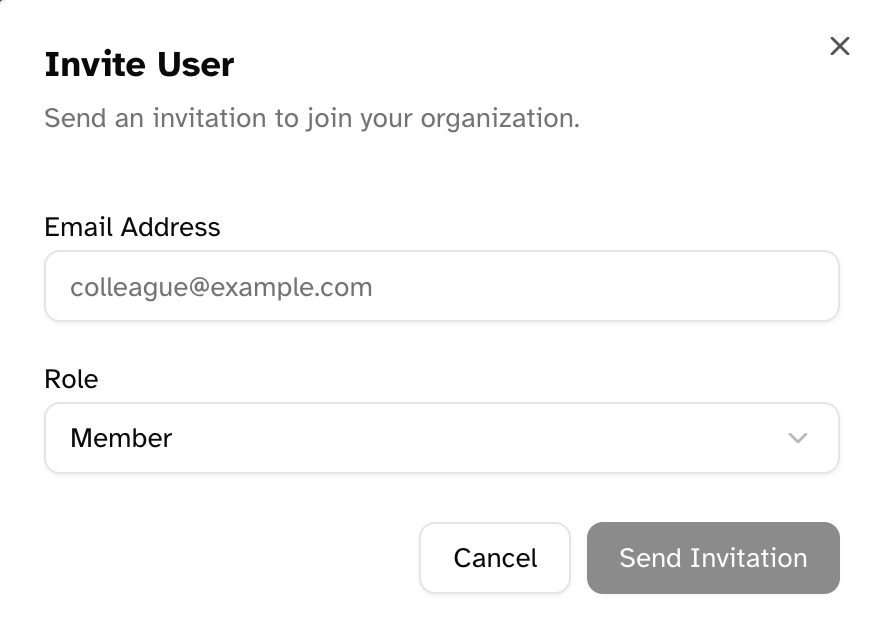
To invite a new team member to your Blinksale organization:
1. Navigate to the User Management settings
2. Click the **Invite User** button at the top right
3. Enter the user's email address
4. Select the appropriate role (Owner or Member)
5. Click **Send Invitation**
## Inviting Team Members
To invite a new team member to your Blinksale organization:
1. Navigate to the User Management settings
2. Click the **Invite User** button at the top right
3. Enter the user's email address
4. Select the appropriate role (Owner or Member)
5. Click **Send Invitation**
 When deciding which role to assign, consider the user's responsibilities. Reserve the Owner role for those who need full administrative access, and use the Member role for team members who only need to manage day-to-day operations.
### Understanding the Invitation Process
After sending an invitation:
1. The invitee receives an email with a link to accept the invitation
2. If they already have a Blinksale account, they can accept and join immediately
3. If they don't have an account, they'll be prompted to create one
4. Once they accept, they'll have access based on their assigned role
5. Invitations expire after 7 days if not accepted
When deciding which role to assign, consider the user's responsibilities. Reserve the Owner role for those who need full administrative access, and use the Member role for team members who only need to manage day-to-day operations.
### Understanding the Invitation Process
After sending an invitation:
1. The invitee receives an email with a link to accept the invitation
2. If they already have a Blinksale account, they can accept and join immediately
3. If they don't have an account, they'll be prompted to create one
4. Once they accept, they'll have access based on their assigned role
5. Invitations expire after 7 days if not accepted
 ## Managing Pending Invitations
For invitations that haven't been accepted yet, you have two options:
### Resending an Invitation
If the recipient hasn't received or can't find the invitation email:
1. Find the invitation in the Pending Invitations section
2. Click the refresh icon
3. Confirm that you want to resend the invitation
4. The invitation will be sent again with a fresh expiration date
### Canceling an Invitation
If you need to revoke an invitation before it's accepted:
1. Find the invitation in the Pending Invitations section
2. Click the trash icon
3. Confirm that you want to cancel the invitation
4. The invitation will be removed and can no longer be accepted
Canceling an invitation is permanent. If you need to invite the user again, you'll have to send a new invitation.
## Managing Team Members
Once a user has accepted their invitation and joined your organization, you can manage their access in several ways:
### Changing a User's Role
To update a user's permissions:
1. Find the user in the Team Members section
2. Click the shield icon next to their entry
3. Select the new role from the dropdown menu
4. Click **Update Role**
## Managing Pending Invitations
For invitations that haven't been accepted yet, you have two options:
### Resending an Invitation
If the recipient hasn't received or can't find the invitation email:
1. Find the invitation in the Pending Invitations section
2. Click the refresh icon
3. Confirm that you want to resend the invitation
4. The invitation will be sent again with a fresh expiration date
### Canceling an Invitation
If you need to revoke an invitation before it's accepted:
1. Find the invitation in the Pending Invitations section
2. Click the trash icon
3. Confirm that you want to cancel the invitation
4. The invitation will be removed and can no longer be accepted
Canceling an invitation is permanent. If you need to invite the user again, you'll have to send a new invitation.
## Managing Team Members
Once a user has accepted their invitation and joined your organization, you can manage their access in several ways:
### Changing a User's Role
To update a user's permissions:
1. Find the user in the Team Members section
2. Click the shield icon next to their entry
3. Select the new role from the dropdown menu
4. Click **Update Role**
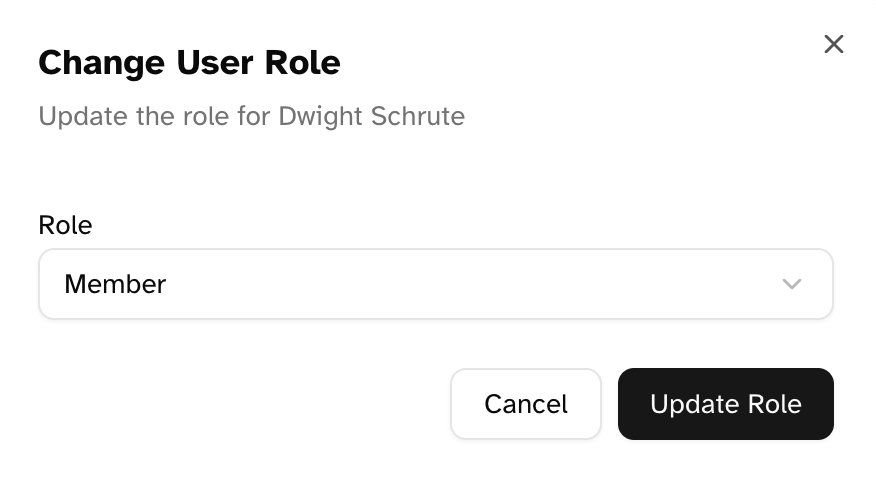 When you change a user's role, their permissions update immediately. If you promote someone from Member to Owner, they'll instantly gain access to all administrative features.
### Removing a User
If someone no longer needs access to your organization:
1. Find the user in the Team Members section
2. Click the trash icon next to their entry
3. Confirm that you want to remove the user
4. The user will be removed from your organization
Removing a user is permanent and cannot be undone. The user will lose access to your organization immediately. If they need access again in the future, you'll need to send a new invitation.
You cannot change your own role or remove yourself from the organization. If you're the only owner, you must transfer ownership to another user before you can be removed.
## Best Practices for User Management
### Security
* **Limit Owner roles**: Only assign the Owner role to users who absolutely need administrative access
* **Regularly review access**: Periodically check your user list and remove access for those who no longer need it
* **Update roles promptly**: When team members' responsibilities change, update their roles accordingly
### Onboarding
* **Inform users before inviting**: Let team members know to expect an invitation email
* **Include onboarding information**: When inviting new users, send them additional information about your organization's processes
* **Verify acceptance**: Follow up with invitees to ensure they've accepted their invitations
### Offboarding
* **Remove access immediately**: When team members leave your organization, remove their access right away
* **Reassign responsibilities**: Ensure another team member takes over any ongoing tasks or client relationships
* **Document changes**: Keep a record of user access changes for compliance and auditing purposes
## Troubleshooting
### Common Issues
**Invitation not received:**
* Check that the email address was entered correctly
* Ask the recipient to check their spam folder
* Use the resend invitation feature
* If problems persist, cancel the invitation and create a new one
**Cannot remove a user:**
* Ensure you have Owner permissions
* You cannot remove yourself
* If you're trying to remove the only Owner, you must transfer ownership first
**User has wrong permissions:**
* Verify the user's assigned role
* Update the role if necessary
* Have the user log out and back in if permission changes don't take effect immediately
By effectively managing users in your Blinksale organization, you can ensure that team members have appropriate access while maintaining security and accountability.
When you change a user's role, their permissions update immediately. If you promote someone from Member to Owner, they'll instantly gain access to all administrative features.
### Removing a User
If someone no longer needs access to your organization:
1. Find the user in the Team Members section
2. Click the trash icon next to their entry
3. Confirm that you want to remove the user
4. The user will be removed from your organization
Removing a user is permanent and cannot be undone. The user will lose access to your organization immediately. If they need access again in the future, you'll need to send a new invitation.
You cannot change your own role or remove yourself from the organization. If you're the only owner, you must transfer ownership to another user before you can be removed.
## Best Practices for User Management
### Security
* **Limit Owner roles**: Only assign the Owner role to users who absolutely need administrative access
* **Regularly review access**: Periodically check your user list and remove access for those who no longer need it
* **Update roles promptly**: When team members' responsibilities change, update their roles accordingly
### Onboarding
* **Inform users before inviting**: Let team members know to expect an invitation email
* **Include onboarding information**: When inviting new users, send them additional information about your organization's processes
* **Verify acceptance**: Follow up with invitees to ensure they've accepted their invitations
### Offboarding
* **Remove access immediately**: When team members leave your organization, remove their access right away
* **Reassign responsibilities**: Ensure another team member takes over any ongoing tasks or client relationships
* **Document changes**: Keep a record of user access changes for compliance and auditing purposes
## Troubleshooting
### Common Issues
**Invitation not received:**
* Check that the email address was entered correctly
* Ask the recipient to check their spam folder
* Use the resend invitation feature
* If problems persist, cancel the invitation and create a new one
**Cannot remove a user:**
* Ensure you have Owner permissions
* You cannot remove yourself
* If you're trying to remove the only Owner, you must transfer ownership first
**User has wrong permissions:**
* Verify the user's assigned role
* Update the role if necessary
* Have the user log out and back in if permission changes don't take effect immediately
By effectively managing users in your Blinksale organization, you can ensure that team members have appropriate access while maintaining security and accountability.