> ## Documentation Index
> Fetch the complete documentation index at: https://docs.blinksale.com/llms.txt
> Use this file to discover all available pages before exploring further.
# Email Domain
> Configure a custom email domain to improve deliverability and brand consistency
## Introduction
Configuring a custom email domain in Blinksale allows you to send invoices, estimates, and other communications from your own business domain (like `invoices@yourbusiness.com`) rather than a generic Blinksale address. This feature significantly improves your brand consistency and email deliverability, ensuring your important financial communications reach your clients' inboxes instead of spam folders.
## Why Use a Custom Email Domain?
Using a custom email domain offers several important benefits:
### Better Email Deliverability
Emails sent from your own verified domain are less likely to be flagged as spam by email providers, increasing the chances that your invoices and reminders will reach your clients' inboxes.
### Professional Branding
Communications from your own domain (like `billing@yourbusiness.com`) look more professional and trustworthy than generic third-party domains, reinforcing your brand identity.
### Improved Client Trust
When clients receive emails from a domain they recognize, they're more likely to open them promptly, which can lead to faster payments and better communication.
## Accessing Domain Settings
To configure your custom email domain:
1. Click on the **Settings** icon in the main sidebar
2. Select **Domain** from the settings menu
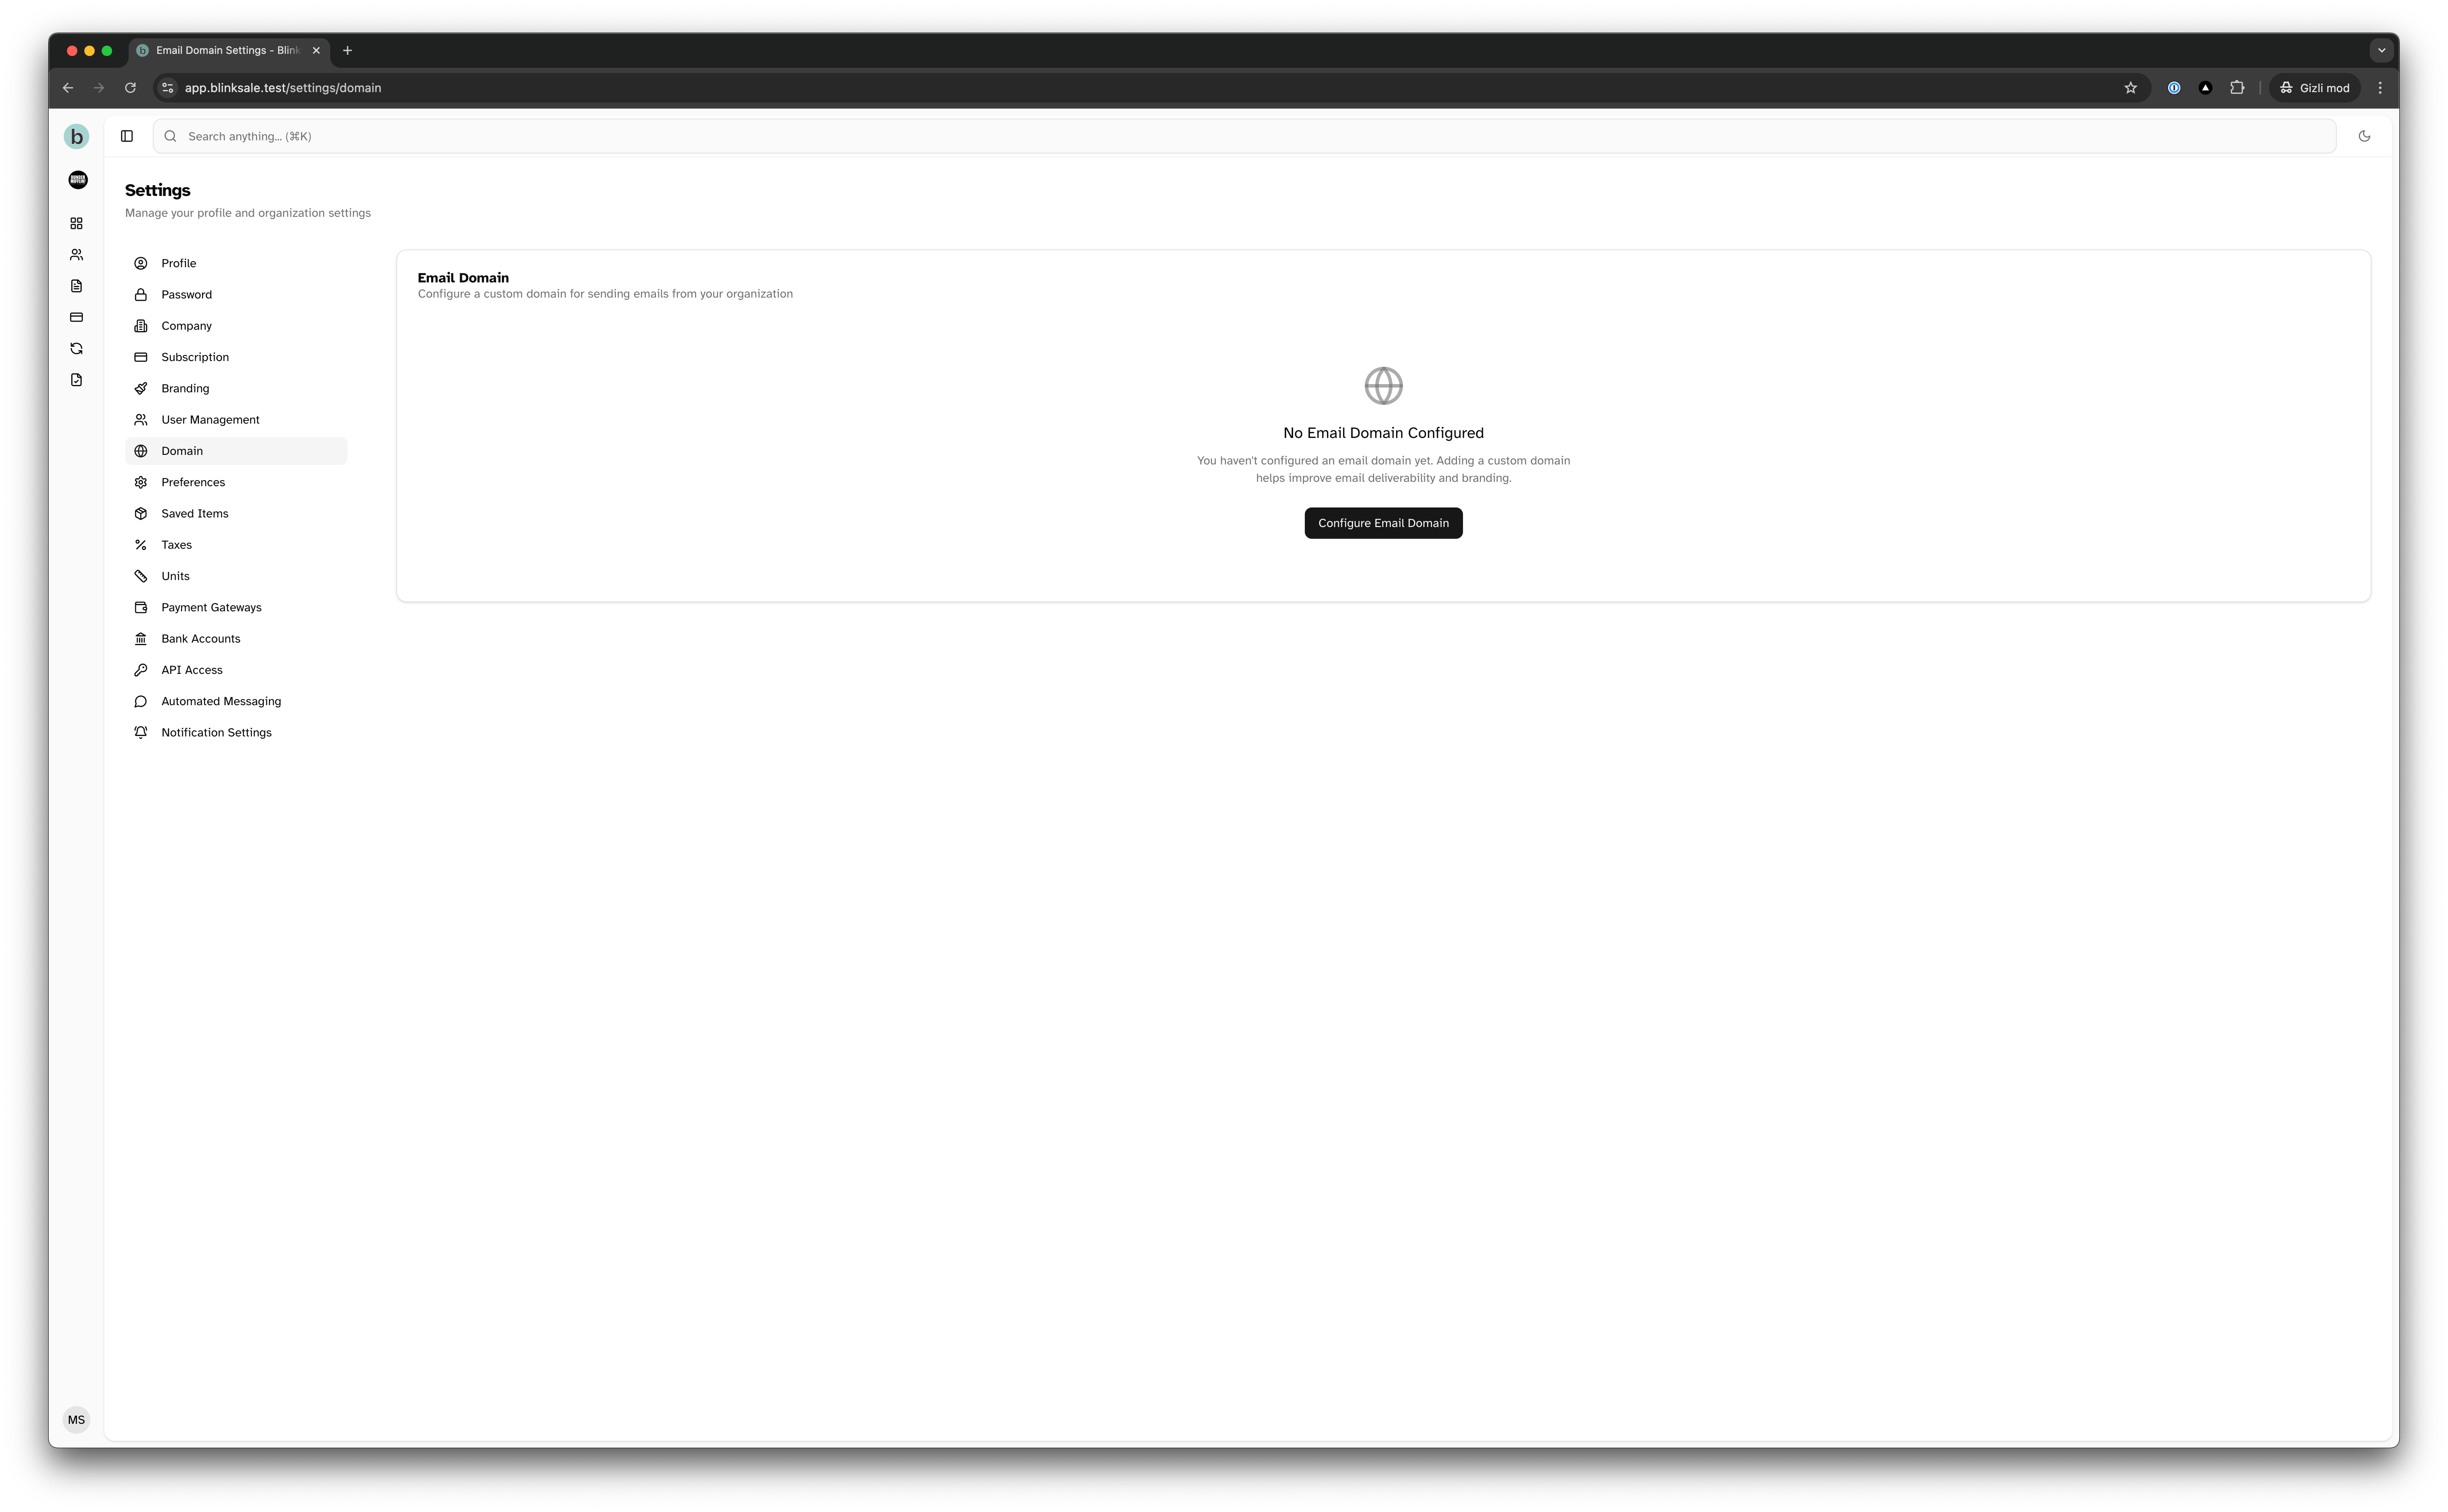
3. You'll be taken to the Email Domain settings page where you can add and manage your domain
 ## Adding a Custom Domain
When you first visit the Domain settings page, you'll see an option to configure an email domain if you haven't done so already.
To add a new domain:
1. Click on the **Configure Email Domain** button
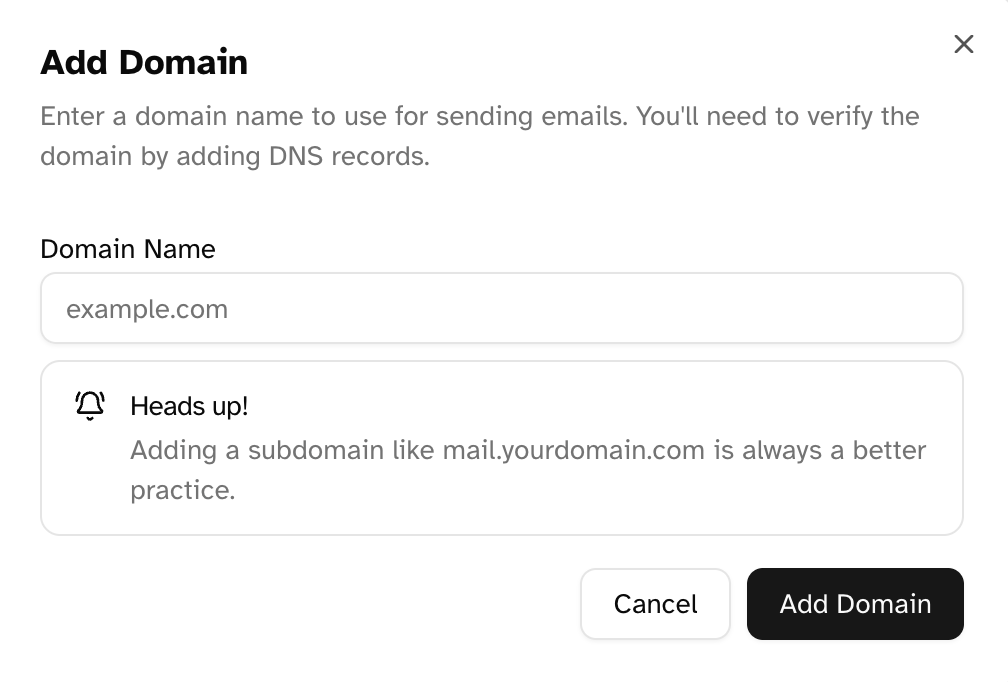
2. In the dialog that appears, enter your domain name (e.g., `yourbusiness.com` or preferably a subdomain like `mail.yourbusiness.com`)
3. Click **Add Domain**
It's recommended to use a subdomain (like `mail.yourbusiness.com`) rather than your root domain for email configuration. This provides more flexibility and avoids potential conflicts with existing website or email settings.
## Adding a Custom Domain
When you first visit the Domain settings page, you'll see an option to configure an email domain if you haven't done so already.
To add a new domain:
1. Click on the **Configure Email Domain** button
2. In the dialog that appears, enter your domain name (e.g., `yourbusiness.com` or preferably a subdomain like `mail.yourbusiness.com`)
3. Click **Add Domain**
It's recommended to use a subdomain (like `mail.yourbusiness.com`) rather than your root domain for email configuration. This provides more flexibility and avoids potential conflicts with existing website or email settings.
 ## Verifying Your Domain
After adding your domain, you'll need to verify ownership by adding several DNS records to your domain's DNS configuration. These records prove that you control the domain and allow Blinksale to send emails on your behalf.
### Understanding DNS Records
The domain settings page will show you all the required DNS records that need to be added to your domain:
## Verifying Your Domain
After adding your domain, you'll need to verify ownership by adding several DNS records to your domain's DNS configuration. These records prove that you control the domain and allow Blinksale to send emails on your behalf.
### Understanding DNS Records
The domain settings page will show you all the required DNS records that need to be added to your domain:
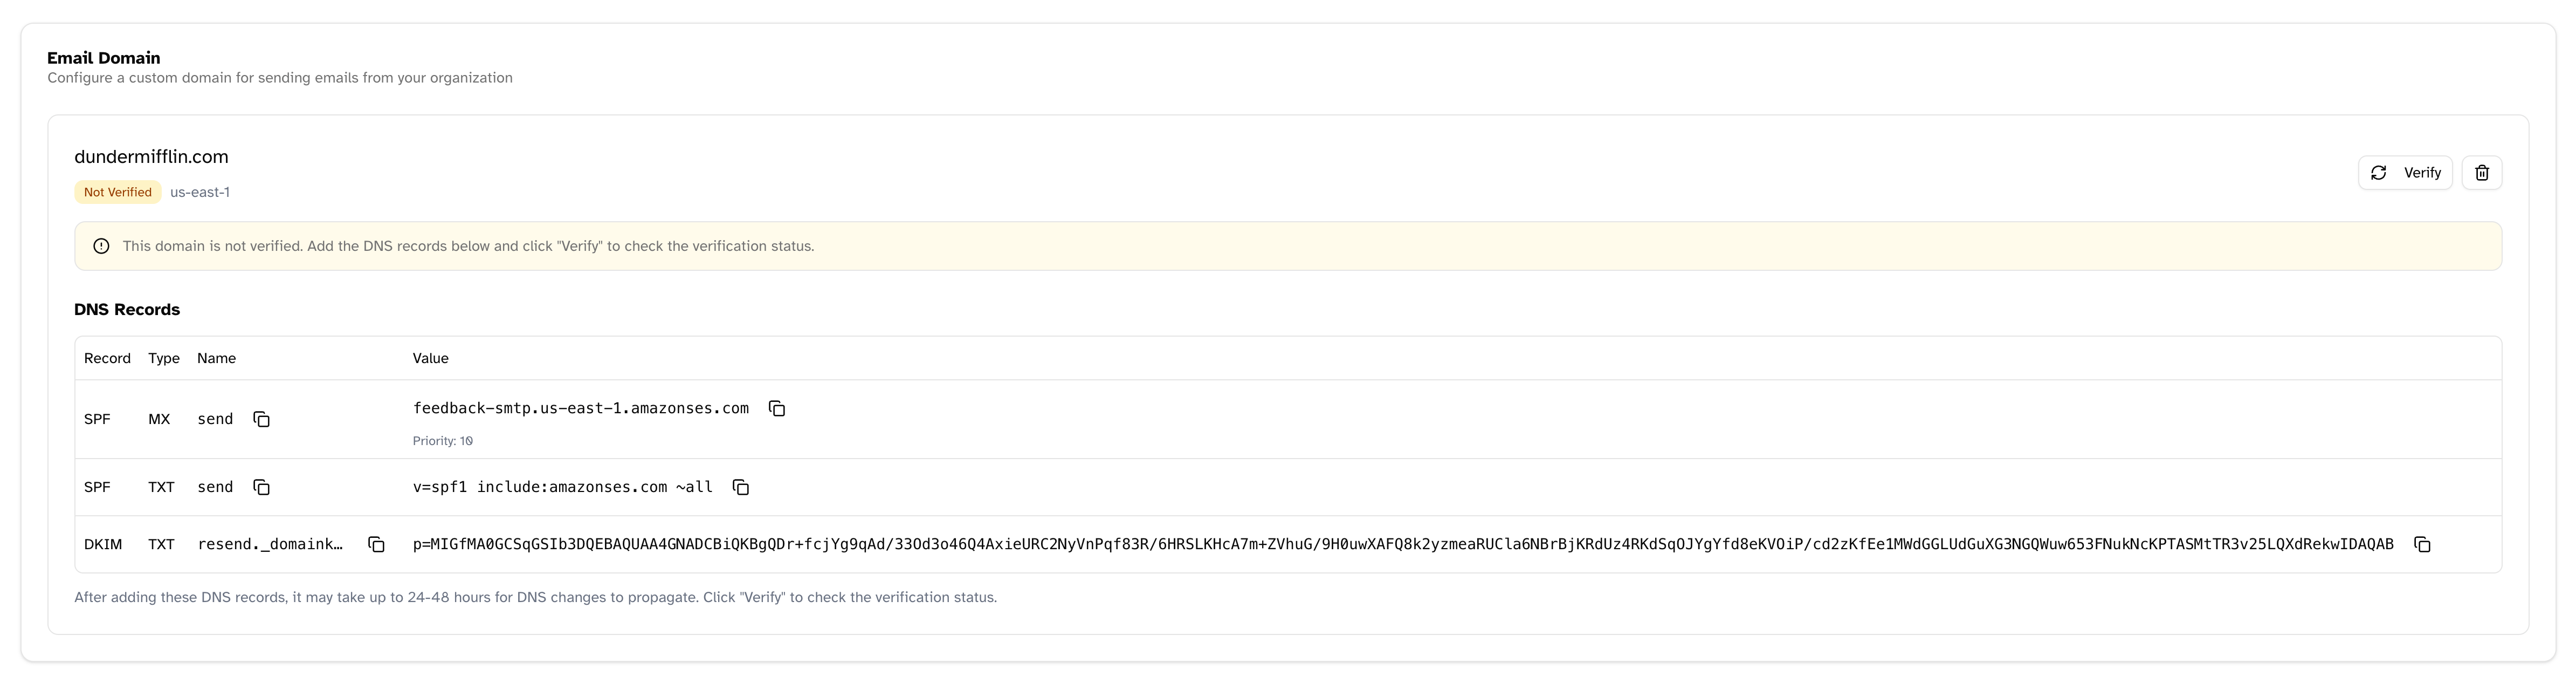 Typically, you'll need to add:
1. **TXT records** - Text records that prove domain ownership
2. **MX records** - Mail exchange records that handle email routing
3. **CNAME records** - Records that map subdomains to another domain
4. **DKIM records** - Records for email authentication
Each record will have:
* **Type** - The type of DNS record (TXT, MX, CNAME, etc.)
* **Name** - The hostname to create the record for
* **Value** - The value/content of the record
* **Priority** - For some record types like MX records
### Adding DNS Records
To add these records:
1. Log in to your domain registrar or DNS provider (like GoDaddy, Namecheap, Cloudflare, etc.)
2. Navigate to the DNS management section
3. Add each record shown in the Blinksale interface
4. Save your changes
You can copy record values directly from the Blinksale interface using the copy button next to each value. This helps avoid typing errors when adding complex record values.
DNS changes can take anywhere from a few minutes to 48 hours to propagate across the internet. Be patient when waiting for verification to complete.
### Checking Verification Status
After adding the DNS records:
1. Return to the Domain settings page in Blinksale
2. Click the **Verify** button to check if your records have been properly configured
3. If verification succeeds, you'll see a confirmation message and your domain status will change to "Verified"
4. If verification fails, check your DNS records again for any errors or typos
Typically, you'll need to add:
1. **TXT records** - Text records that prove domain ownership
2. **MX records** - Mail exchange records that handle email routing
3. **CNAME records** - Records that map subdomains to another domain
4. **DKIM records** - Records for email authentication
Each record will have:
* **Type** - The type of DNS record (TXT, MX, CNAME, etc.)
* **Name** - The hostname to create the record for
* **Value** - The value/content of the record
* **Priority** - For some record types like MX records
### Adding DNS Records
To add these records:
1. Log in to your domain registrar or DNS provider (like GoDaddy, Namecheap, Cloudflare, etc.)
2. Navigate to the DNS management section
3. Add each record shown in the Blinksale interface
4. Save your changes
You can copy record values directly from the Blinksale interface using the copy button next to each value. This helps avoid typing errors when adding complex record values.
DNS changes can take anywhere from a few minutes to 48 hours to propagate across the internet. Be patient when waiting for verification to complete.
### Checking Verification Status
After adding the DNS records:
1. Return to the Domain settings page in Blinksale
2. Click the **Verify** button to check if your records have been properly configured
3. If verification succeeds, you'll see a confirmation message and your domain status will change to "Verified"
4. If verification fails, check your DNS records again for any errors or typos
 ## Configuring Your Sending Email Address
Once your domain is verified, you can configure the specific email address that will be used as the "From" address for all communications from Blinksale.
To set up your sending email address:
1. In the verified domain section, find the Email Settings area
2. Click the **Change** button next to the current email address
3. Enter your preferred email prefix (the part before the @ symbol)
4. Click **Save**
## Configuring Your Sending Email Address
Once your domain is verified, you can configure the specific email address that will be used as the "From" address for all communications from Blinksale.
To set up your sending email address:
1. In the verified domain section, find the Email Settings area
2. Click the **Change** button next to the current email address
3. Enter your preferred email prefix (the part before the @ symbol)
4. Click **Save**
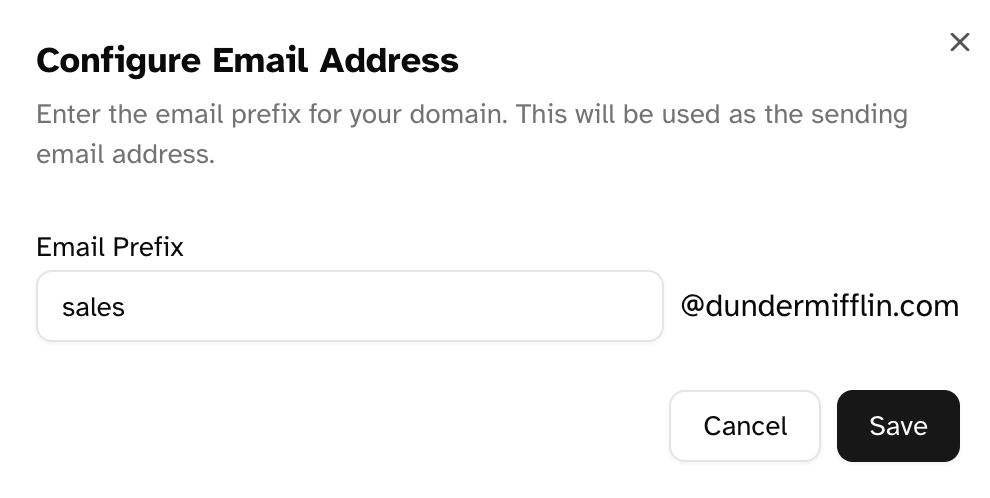 Common email prefixes for business communications include:
* `invoices`
* `billing`
* `accounts`
* `finance`
* `payments`
* `sales`
You don't need to create this email address in your own email system. Blinksale handles the sending infrastructure once your domain is verified. However, make sure you're not using an email prefix that already exists for another purpose in your organization.
## Managing Your Domain
After your domain is verified and configured, you have several options for managing it:
### Updating Your Sending Email
To change the sending email address:
1. Click the **Change** button next to the current email address
2. Enter a new email prefix
3. Click **Save**
### Removing Your Domain
If you need to remove your custom domain:
1. Click the delete (trash) icon next to your domain
2. Confirm the deletion in the dialog that appears
3. Your domain will be removed, and Blinksale will revert to using the default system emails
Removing a domain is permanent. If you want to use a custom domain again after deletion, you'll need to go through the entire verification process again.
## Troubleshooting
### Common Domain Verification Issues
**Verification continues to fail:**
* Ensure you've added all the required DNS records exactly as shown
* Check for typos in record names or values
* Confirm you're adding records to the correct domain/subdomain
* Allow sufficient time (24-48 hours) for DNS changes to propagate
* Contact your DNS provider if you're unsure about how to add the required records
**DNS provider limitations:**
* Some DNS providers have limitations on record types or values
* If your provider doesn't support certain record types, consider moving to a more fully-featured DNS provider
### Email Deliverability Issues
**Emails still going to spam:**
* Ensure your domain has been fully verified
* Check that your SPF, DKIM, and other email authentication records are correctly set up
* Consider your domain reputation (newly created domains may need time to build reputation)
**Clients not receiving emails:**
* Verify the email addresses are correct
* Check if clients have strong spam filters that might be blocking your emails
* Ask clients to add your sending address to their safe senders list
## Best Practices
### Domain Selection
* Use a subdomain (like `mail.yourbusiness.com`) rather than your root domain
* Choose a domain that matches your business name and is recognizable to clients
* Avoid using free domain services for professional communications
### Email Address Configuration
* Select a professional and clear email prefix (like `invoices` or `billing`)
* Avoid generic terms that might trigger spam filters
* Consider how the email address will appear to your clients
### Management
* Regularly verify that your domain status remains "Verified"
* Update your DNS records if you change DNS providers
* Keep your domain registration active and renewed to maintain email functionality
By properly configuring a custom email domain in Blinksale, you'll improve the professional appearance of your communications and increase the likelihood that your invoices and notifications reach your clients promptly, helping to streamline your billing process and enhance your brand image.
Common email prefixes for business communications include:
* `invoices`
* `billing`
* `accounts`
* `finance`
* `payments`
* `sales`
You don't need to create this email address in your own email system. Blinksale handles the sending infrastructure once your domain is verified. However, make sure you're not using an email prefix that already exists for another purpose in your organization.
## Managing Your Domain
After your domain is verified and configured, you have several options for managing it:
### Updating Your Sending Email
To change the sending email address:
1. Click the **Change** button next to the current email address
2. Enter a new email prefix
3. Click **Save**
### Removing Your Domain
If you need to remove your custom domain:
1. Click the delete (trash) icon next to your domain
2. Confirm the deletion in the dialog that appears
3. Your domain will be removed, and Blinksale will revert to using the default system emails
Removing a domain is permanent. If you want to use a custom domain again after deletion, you'll need to go through the entire verification process again.
## Troubleshooting
### Common Domain Verification Issues
**Verification continues to fail:**
* Ensure you've added all the required DNS records exactly as shown
* Check for typos in record names or values
* Confirm you're adding records to the correct domain/subdomain
* Allow sufficient time (24-48 hours) for DNS changes to propagate
* Contact your DNS provider if you're unsure about how to add the required records
**DNS provider limitations:**
* Some DNS providers have limitations on record types or values
* If your provider doesn't support certain record types, consider moving to a more fully-featured DNS provider
### Email Deliverability Issues
**Emails still going to spam:**
* Ensure your domain has been fully verified
* Check that your SPF, DKIM, and other email authentication records are correctly set up
* Consider your domain reputation (newly created domains may need time to build reputation)
**Clients not receiving emails:**
* Verify the email addresses are correct
* Check if clients have strong spam filters that might be blocking your emails
* Ask clients to add your sending address to their safe senders list
## Best Practices
### Domain Selection
* Use a subdomain (like `mail.yourbusiness.com`) rather than your root domain
* Choose a domain that matches your business name and is recognizable to clients
* Avoid using free domain services for professional communications
### Email Address Configuration
* Select a professional and clear email prefix (like `invoices` or `billing`)
* Avoid generic terms that might trigger spam filters
* Consider how the email address will appear to your clients
### Management
* Regularly verify that your domain status remains "Verified"
* Update your DNS records if you change DNS providers
* Keep your domain registration active and renewed to maintain email functionality
By properly configuring a custom email domain in Blinksale, you'll improve the professional appearance of your communications and increase the likelihood that your invoices and notifications reach your clients promptly, helping to streamline your billing process and enhance your brand image.